0%

警告:Font shape `OT1/cmss/m/n’ in size <4> not available

\usepackage{lmodern}

或者

\usepackage{anyfontsize}

警告:引用未标号

bibtex 编译后再进行两次 xelatex 编译

错误:There’s no line here to end

错误的使用换行符

https://www.overleaf.com/learn/latex/Errors/LaTeX_Error:_There%27s_no_line_here_to_end

警告:Underfull(Overfull) \hbox message

underfull 是说该处排版内容太稀疏了(badness 10000)是 TeX 衡量排版效果好不好的一个尺度
Overfull 则是说该处内容太多,超出了设定的印刷范围,这多数是由于系统无法找到合适的自动换行点造成的

入门教程

一份(不太)简短的 LaTeX 介绍

插入代码

1
2
3
4
5
6
7
8
9
10
11
12
13
14
15
16
17
18
19
20
21
22
23
24
25
26
27
28
29
30
31
32
33
34
35
% 代码环境
\usepackage{listings}
% 颜色
\usepackage{xcolor}
% 字体
\usepackage{fontspec}
% 代码格式设置
\lstset{
% 语言
language=python,
% 自动换行
breaklines=true,
% 行号
numbers=left,
% 字符串显示空格
showstringspaces=false,
% 基础字体设置
basicstyle=\small\fontspec{Monaco},
% 行号风格
numberstyle=\tiny,
% 字符串风格
stringstyle=\color{orange},
% 注释风格
commentstyle=\color{gray},
% 关键字风格
keywordstyle=\color{blue},
% 左侧margin
xleftmargin = 25pt,
% 添加frame
frame = tb,
% 设置frame左侧margin
framexleftmargin = 20pt,
}
% 引用代码
\lstinputlisting{filepath}

图表公式章节编号

1
2
3
4
5
6
7
8
9
10
11
12
13
14
% 重定义表编号格式
\renewcommand{\thetable}{\thesection-\arabic{table}}
% 重定义图编号格式
\renewcommand{\thefigure}{\thesection-\arabic{figure}}
% 重定义公式编号格式
\renewcommand{\theequation}{\thesection.\arabic{equation}}
\makeatletter
% section计数器增加时重置table计数器
\@addtoreset{table}{section}
% section计数器增加时重置figure计数器
\@addtoreset{figure}{section}
% section计数器增加时重置equation计数器
\@addtoreset{equation}{section}
\makeatother

中英文摘要

1
2
3
4
5
6
7
8
9
10
% 英文摘要
\newenvironment{enabstract}{
\par\small
\noindent\mbox{}\hfill{\bfseries Abstract}\hfill\mbox{}\par
\vskip 2.5ex}{\par\vskip 2.5ex}
% 中文摘要
\newenvironment{cnabstract}{
\par\small
\noindent\mbox{}\hfill{\bfseries 摘要}\hfill\mbox{}\par
\vskip 2.5ex}{\par\vskip 2.5ex}

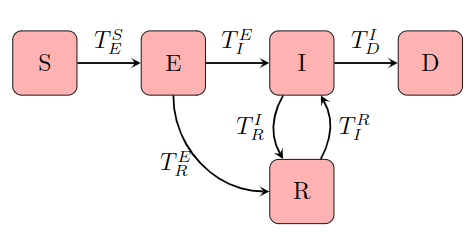
绘制流程图

1
2
3
4
5
6
7
8
9
10
11
12
13
14
15
16
17
18
19
20
21
22
23
24
25
26
27
28
29
30
31
32
33
34
% 引入tikz包
\usepackage{tikz}
% 加入形状箭头
\usetikzlibrary{shapes.geometric,arrows}
% 定义各类节点
\tikzstyle{startstop} = [rectangle,rounded corners, minimum width=1cm,minimum height=1cm,text centered, draw=black,fill=red!30]
\tikzstyle{io} = [trapezium, trapezium left angle = 70,trapezium right angle=110,minimum width=1cm,minimum height=1cm,text centered,draw=black,fill=blue!30]
\tikzstyle{process} = [rectangle,minimum width=1cm,minimum height=1cm,text centered,text width =3cm,draw=black,fill=orange!30]
\tikzstyle{decision} = [diamond,minimum width=1cm,minimum height=1cm,text centered,draw=black,fill=green!30]
\tikzstyle{arrow} = [thick,->,>=stealth]

% 绘制
\begin{figure}[H]
\centering
% 开始tikzpicture绘制环境
% node distance为节点间默认距离
\begin{tikzpicture}[node distance=2cm]
% 定义各个节点及相对(或绝对)位置
\node[startstop](S){S};
\node[startstop,right of=S](E){E};
\node[startstop,right of=E](I){I};
\node[startstop,right of=I](D){D};
\node[startstop,below of=I](R){R};
% 开始连线
\draw[arrow](S)--node[above]{$S\to E$}(E);
\draw[arrow](E)--node[above]{$E\to I$}(I);
\draw[arrow](I)--node[above]{}(D);
% out, in 为绘制曲线的角度, 详见LaTeX教程
\draw[arrow,out=-90,in=180](E) to node[left]{$E\to R$}(R);
\draw[arrow,out=-120,in=120](I) to node[left]{$I\to R$}(R);
\draw[arrow,out=60,in=-60](R) to node[right]{$R\to I$}(I);
\end{tikzpicture}
\caption{$SEIRD$模型流程图}
\end{figure}

效果如下
SEIRD模型流程图

设置章节格式

1
2
3
4
5
6
% 章节格式
\usepackage{titlesec}
% 设置章节格式
\titleformat{\section}{\centering\heiti\zihao{-3}}{第\arabic{section}章}{1em}{}
\titleformat*{\subsection}{\heiti\zihao{4}}
\titleformat*{\subsubsection}{\heiti\zihao{-4}}

下载

sudo apt install python(3)-scipy

pip(3) install scipy

解微分方程

odeint()函数

需要至少三个参数

  • 微分方程函数
  • 微分方程初值
  • 微分自变量

用法

以 SIR 模型为例

1
2
3
4
5
6
7
8
9
10
11
12
13
14
15
16
17
18
19
20
21
22
23
24
25
26
27
28
29
30
31
32
33
34
35
36
import numpy as np
import pandas as pd
from scipy.integrate import odeint
from matplotlib import pyplot as plt


# 微分方程
def diff(y, t, s2ip, i2rp):
s, i, r = y
s2i = i * s * s2ip
i2r = i * i2rp
ds = -s2i
di = s2i - i2r
dr = i2r
return [ds, di, dr]

# 自变量范围
t = np.arange(0, 90)
# 求解
y = odeint(
# 微分方程
func=diff,
# y初值
y0=(1, 0.01, 0),
# 自变量
t=t,
# 其他参数(此处为s2ip,i2rp)
args=(0.4, 0.2)
)

# 返回数据为积分后的数值序列
data = pd.DataFrame(y)
data.columns = ['S', 'I', 'R']
data.plot()
plt.show()

优化模型,拟合数据

minimize

1
2
3
4
5
6
# 定义损失函数
# 返回一个值用来量化与期望的大小
def lose_fun(
x0, # 变量值
args, # 其他参数(常数值)
)
1
2
3
4
5
6
7
8
9
# 优化函数
# 返回值res.x取得优化后的参数
def minimize(
fun, # 损失函数/目标函数
x0, # 变量的初始值猜测值
args, # lose_fun的其他参数
method, # 优化方法
bounds, # 参数范围[(min,max),(min,max),...]
)

vim 配置文件为/etc/vim/vimrc
可以直接更改这个文件,
也可以在用户目录下创建一个.vimrc文件。

前者应用所有用户,
后者仅应用当前用户

基本设置

1
2
3
4
5
6
7
8
9
10
11
12
13
14
15
16
17
18
19
20
21
22
23
24
25
26
27
28
29
30
31
32
33
34
35
36
37
38
39
40
41
42
43
44
45
46
47
48
49
50
51
52
53
54
" 显示行号
set number
" 启动的时候不显示那个援助乌干达儿童的提示
set shortmess=atI
" 输入的命令显示出来
set showcmd
" 不要闪烁
set novisualbell
"状态行显示的内容
set statusline=%F%m%r%h%w\ [FORMAT=%{&ff}]\ [TYPE=%Y]\ [POS=%l,%v][%p%%]\ %{strftime(\"%H:%M\")}
" 设置当文件被改动时自动载入
set autoread
"共享剪贴板
set clipboard+=unnamed
"从不备份
set nobackup
" 突出显示当前行
set cursorline
" 不使用vi的键盘模式
set nocompatible
" 语法高亮
set syntax=on
" 去掉输入错误的提示声音
set noeb
" 在处理未保存或只读文件的时候,弹出确认
set confirm
" 自动缩进
set smartindent
set autoindent
set cindent
" Tab键的宽度
set tabstop=4
" 统一缩进为4
set softtabstop=4
set shiftwidth=4
" 在行和段开始处使用制表符
set smarttab
" 历史记录数
set history=1000
" 禁止生成临时文件
set nobackup
set noswapfile
" 编码设置
set enc=utf-8
set fencs=utf-8,ucs-bom,shift-jis,gb18030,gbk,gb2312,cp936
" 语言设置
set langmenu=zh_CN.UTF-8
set helplang=cn
" 命令行(在状态行下)的高度,默认为1,这里是2
set laststatus=2
" 侦测文件类型
filetype on
" 带有如下符号的单词不要被换行分割
set iskeyword+=_,$,@,%,#,-

自动补全

1
2
3
4
5
6
7
8
9
10
11
12
13
14
15
16
"自动补全
:inoremap ( ()<ESC>i
:inoremap ) <c-r>=ClosePair(')')<CR>
:inoremap { {<CR>}<ESC>O
:inoremap } <c-r>=ClosePair('}')<CR>
:inoremap [ []<ESC>i
:inoremap ] <c-r>=ClosePair(']')<CR>
:inoremap " ""<ESC>i
:inoremap ' ''<ESC>i
function! ClosePair(char)
if getline('.')[col('.') - 1] == a:char
return "\<Right>"
else
return a:char
endif
endfunction

编译运行调试源文件

1
2
3
4
5
6
7
8
9
10
11
12
13
14
15
16
17
18
19
20
21
22
23
24
25
26
27
" 按F5编译运行
map <F5> :call CompileRunGcc()<CR>
func! CompileRunGcc()
exec "w"
exec "!clear"
if &filetype == 'c'
exec "!g++ % -o %<"
exec "! ./%<"
elseif &filetype == 'cpp'
exec "!g++ % -o %<"
exec "! ./%<"
elseif &filetype == 'python'
exec "!python3 %"
elseif &filetype == 'java'
exec "!javac %"
exec "!java %<"
elseif &filetype == 'sh'
:!./%
endif
endfunc
" C,C++的调试
map <F6> :call Rungdb()<CR>
func! Rungdb()
exec "w"
exec "!g++ % -g -o %<"
exec "!gdb ./%<"
endfunc

Vim

模块化编辑

Database Client

作者cweijan,兼容绝大多数数据库的连接,免费版限制同时三个连接

Docker

极其方便的管理Docker镜像及容器

Python

Python 支持,推荐是因为python是必不可少的工具

Encode Decode

作者Mitch Denny,极其方便的编码解码

hexdump for VSCode

作者slevesque,可查看hex文件内容

LaTeX Workshop

LaTeX 就用它

Markdown All in One & Markdown PDF & Markdown Preview Enhanced

Markdown套餐

Path Intellisense

路径自动补全

Remote-SSH

远程ssh管理

vscode-json

json格式化

LaTeX 环境安装

  • Windows

    官网 下载安装

  • Linux

    官网 可以下载,推荐 apt 安装

    sudo apt install texlive-full

IDE 安装配置

TexStudio

  • 优点:安装方便,操作方便,免费, 跨平台

  • 缺点:UI 丑陋,格式化不方便,中文支持差

  • 安装

    • Windows

      官网

    • Linux

      sudo apt install texstudio

  • 配置

    1. Options > Configure
    2. General > Language 选择语言
    3. Build 下调整编译设置(中文文档推荐 xelatex)

VSCode

  • 优点:安装简单,UI 漂亮,插件多,维护积极,开源免费,跨平台,中文友好

  • 缺点:配置较为繁琐

  • 安装

    官网

  • 配置

    1. 安装 latex workshop(提供良好的开发环境)

      Ctrl+Shift+P 搜索 Latex workshop 可以查看插件命令

    2. 安装 Latex Preview(文档预览,根据个人喜好选择)

    3. 设置中搜索 latex workshop json 加入如下内容( xelatex + bib 配置)

      1
      2
      3
      4
      5
      6
      7
      8
      9
      10
      11
      12
      13
      14
      15
      16
      17
      18
      19
      20
      21
      22
      23
      24
      25
      26
      27
      28
      29
      30
      31
      32
      33
      34
      35
      36
      37
      38
      39
      40
      41
      42
      43
      44
      45
      46
      47
      48
      49
      50
      51
      52
      53
      54
      55
      56
      57
      58
      59
      60
      61
      62
      63
      64
      65
      66
      67
      68
      69
      // LaTeX
      // 从tab打开pdf预览
      "latex-workshop.view.pdf.viewer": "tab"
      // 保存自动编译
      // "latex-workshop.latex.autoBuild.run": "never",
      // 不显示警告(错误)气泡
      "latex-workshop.message.error.show": false,
      "latex-workshop.message.warning.show": false,
      "latex-workshop.latex.tools": [
      {
      // 编译工具和命令
      "name": "xelatex",
      "command": "xelatex",
      "args": [
      "-synctex=1",
      "-interaction=nonstopmode",
      "-file-line-error",
      "-pdf",
      "%DOCFILE%"
      ]
      },
      {
      "name": "bibtex",
      "command": "bibtex",
      "args": [
      "%DOCFILE%"
      ]
      }
      ],
      "latex-workshop.latex.recipes": [
      {
      "name": "xelatex",
      "tools": [
      "xelatex"
      ],
      },
      {
      "name": "xe->bib->xe->xe",
      "tools": [
      "xelatex",
      "bibtex",
      "xelatex",
      "xelatex"
      ]
      },
      ],
      // 自动清理无用的中间文件
      "latex-workshop.latex.autoClean.run": "onBuilt",
      "latex-workshop.latex.clean.fileTypes": [
      "*.aux",
      "*.bbl",
      "*.blg",
      "*.idx",
      "*.ind",
      "*.lof",
      "*.lot",
      "*.out",
      "*.toc",
      "*.acn",
      "*.acr",
      "*.alg",
      "*.glg",
      "*.glo",
      "*.gls",
      "*.ist",
      "*.fls",
      "*.log",
      "*.fdb_latexmk",
      ],

版权声明:本文为 CSDN 博主「yitiaodashu」的原创文章,遵循 CC 4.0 BY-SA 版权协议
原文链接 https://blog.csdn.net/yitiaodashu/article/details/79023987

模块的调用

Python 中导入模块时,实际上会把被导入的模块执行一遍,如下:
先看被调用的模块test.py

1
2
3
4
def haha():
print("哈哈")

haha()

再看主程序main.py

1
2
3
import test

print("一条大树")

执行结果是:

1
2
哈哈
一条大树

那怎么才能只是单纯调用而不执行被调用模块的代码呢?
要想被调用模块代码不被执行,前提得知道变量__name__是什么意思,简单来说就是,如果不涉及模块导入的话,__name__的值就是 __main__,如果当此模块被导入引用的话,那么这个模块内的__name__值就是文件的名字(不带.py),如下 test_1.py

1
2
3
4
5
def haha():
print("哈哈")

haha()
print(__name__)

test_1.py 执行结果为:

1
2
哈哈
__main__

如果 test_1 被导入引用的话,如 test_2

1
2
3
import test_1

print("一条大树")

test_2 运行结果为:

1
2
3
哈哈
test_1
一条大树

上边所说要是弄懂的话,那我们在被调用的模块中,可执行的代码前加上这么一句判断,if __name__ == '__main__':,被调用的模块的代码就不会被执行了!

pycache的作用

以下参考自 Joy_Shen 的一个回答。
先大概了解一下 python 基本运行机制。Python 程序运行时不需要编译成二进制代码,而直接从源码运行程序,简单来说是,Python 解释器将源码转换为字节码,然后再由解释器来执行这些字节码。

解释器的具体工作:

  1. 完成模块的加载和链接;
  2. 将源代码编译为 PyCodeObject 对象(即字节码),写入内存中,供 CPU 读取;
  3. 从内存中读取并执行,结束后将 PyCodeObject 写回硬盘当中,也就是复制到.pyc 或.pyo 文件中,以保存当前目录下所有脚本的字节码文件。

之后若再次执行该脚本,它先检查【本地是否有上述字节码文件】和【该字节码文件的修改时间是否在其源文件之后】,是就直接执行,否则重复上述步骤。

那有的小伙伴就有疑问了,__pycache__ 文件夹的意义何在呢?
因为第一次执行代码的时候,Python 解释器已经把编译的字节码放在__pycache__文件夹中,这样以后再次运行的话,如果被调用的模块未发生改变,那就直接跳过编译这一步,直接去__pycache__文件夹中去运行相关的 *.pyc 文件,大大缩短了项目运行前的准备时间。

pyecharts 安装

pip(pip3) install pyecharts

pyecharts 使用

官方教程

pyecharts 渲染图片

pyecharts 提供了 selenium, phantomjspyppeteer 三种方式。

笔者只用过phantomjs,其他的可以参考官方教程

引入

1
from pyecharts.render import make_snapshot

API

1
2
3
4
5
6
7
8
9
10
11
12
13
14
15
16
17
18
19
20
21
22
23
def make_snapshot(
# 渲染引擎,可选 selenium 或者 phantomjs
engine: Any,

# 传入 HTML 文件路径
file_name: str,

# 输出图片路径
output_name: str,

# 延迟时间,避免图还没渲染完成就生成了图片,造成图片不完整
delay: float = 2,

# 像素比例,用于调节图片质量
pixel_ratio: int = 2,

# 渲染完图片是否删除原 HTML 文件
is_remove_html: bool = False,

# 浏览器类型,目前仅支持 Chrome, Safari,使用 snapshot-selenium 时有效
browser: str = "Chrome",
**kwargs,
)

snapshot-phantomjs 安装

snapshot-phantomjspyecharts + phantomjs 渲染图片的扩展,需要先安装 phantomjs,安装方法可以参照官网

  • 安装 phantomjs

    sudo apt install phantomjs

    或者下载 nodejs ,通过 npm 安装
    npm install -g phantomjs-prebuilt

  • 安装 snapshot-phantomjs

    pip(pip3) install snapshot-phantomjs

  • 使用

    此处采取官方示例

    1
    2
    3
    4
    5
    6
    7
    8
    9
    10
    11
    12
    13
    14
    15
    16
    17
    18
    19
    from pyecharts import options as opts
    from pyecharts.charts import Bar
    from pyecharts.render import make_snapshot

    from snapshot_phantomjs import snapshot

    def bar_chart() -> Bar:
    c = (
    Bar()
    .add_xaxis(["衬衫", "毛衣", "领带", "裤子", "风衣", "高跟鞋", "袜子"])
    .add_yaxis("商家A", [114, 55, 27, 101, 125, 27, 105])
    .add_yaxis("商家B", [57, 134, 137, 129, 145, 60, 49])
    .reversal_axis()
    .set_series_opts(label_opts=opts.LabelOpts(position="right"))
    .set_global_opts(title_opts=opts.TitleOpts(title="Bar-测试渲染图片"))
    )
    return c

    make_snapshot(snapshot, bar_chart().render(), "bar0.png")

使用 pyecharts 过程中遇到的问题

pyecharts 处理 pandas 数据图像不显示

原因在于数据没有被 list 处理

  • 错误示例

    1
    2
    line_e.add_xaxis(data.index)
    line_e.add_yaxis(series_name='error', y_axis=data['y_data'])
  • 正确示例

    1
    2
    line_r.add_xaxis(data.index.tolist())
    line_r.add_yaxis(series_name='right', y_axis=data['y_data'].tolist())

    对数据进行.list()将其列表化就可以显示图像了

make_snapshot 报错

  • 渲染引擎未安装
  • render 保存路径不能含有中文

进入 blog 目录

cd blog_folder

下载 Next 主题

git clone git@github.com:theme-next/hexo-theme-next.git themes/next

修改/_config.yml

  • 修改主题
    1
    theme: next
  • 修改站点信息
    1
    2
    3
    4
    5
    6
    title:
    subtitle:
    description:
    author: author
    language: zh-CN
    timezone: Asia/Shanghai

修改/theme/next/_config.yml

  • 选择风格

    搜索 scheme,去掉所选风格前的注释

    1
    2
    3
    4
    #scheme: Muse
    #scheme: Mist
    scheme: Pisces
    #scheme: Gemini
  • 设置菜单项及所对应的文件目录

    搜索 menu ,通过注释菜单项来开启或关闭菜单项

    1
    2
    3
    4
    5
    6
    7
    8
    9
    menu:
    home: /|| home
    #about: /about/|| user
    tags: /tags/|| tags
    #categories: /categories/|| th
    #archives: /archives/|| archive # 归档显示错误注释此行
    #schedule: /schedule/|| calendar
    #sitemap: /sitemap.xml|| sitemap
    #commonweal: /404/|| heartbeat

    ||后面的图标
    图标必须为 FontAwesome 网站中存在的图标的名字

  • 创建菜单项对应文件目录,以tags为例

    hexo n page tags

    编辑/source/tags/index.mdtype属性的值写为tags

    1
    2
    3
    4
    5
    ---
    title: tags
    date: 2020-04-10 17:40:53
    type: "tags"
    ---
    • 在新创建的文章中加入 tag

      1
      2
      3
      4
      5
      6
      7
      ---
      title: new_file
      date: 2020-04-11 19:55:31
      tags:
      - tag_1
      - tag_2
      ---
  • 添加头像

    搜索 Avatar,可以用图片链接或本地图片(本地图片需要放在/source/images/下)

    1
    2
    # avatar: http://example.com/avatar.png
    avatar: /images/avatar.jpg
  • 显示浏览进度

    搜索 scrollpercent,值改为true

    1
    scrollpercent: true
  • 侧边栏社交链接

    搜索 social

    1
    2
    3
    social:
    GitHub: https://github.com/luotianqi777 || github
    E-Mail: mailto:luotianqi777@gmail.com || envelope

    ||后为图标,图标必须为 FontAwesome 网站中存在的图标的名字

购买 VPS

选择 VPS 服务商

推荐 Vultr 可以随时更换主机
现在主机贵了,能用做 VPS 的起步 $5/month
充值最少$10

选择服务器

  • 位置

    人在大陆的话选日本的主机比较快,但据说也容易被封
    查 IP 网址https://ip.cn/

  • 价格

    价位选最便宜的就好,不过必须支持 IPv4

  • 系统

    推荐CentOS 7 x64
    据说更高版本可能失败,我也没试过
    只为转发数据而已,高版本也没什么意义

为 VPS 安装 SSR 服务

SSH 连接 VPS

ssh root@server_ip

能连上就输入服务商给的密码,不能就再部署一个,最后把旧的删除

密码在 manage 中可以找到

测试能否访问到需要访问的网站

ping google.com

效果满意则安装 SSR 服务

wget -N --no-check-certificate https://raw.githubusercontent.com/luvvien/ssr-install-shellscript/master/ssr.sh

开始安装程序

chmod +x ssr.sh && bash ssr.sh

开始安装(括号内为我的选择)

  • 输入 1 开始安装 SSR

  • 输入端口号(10086)

  • 输入密码(*********)

  • 选择加密方式(7: aes-256-ctr)

  • 选择协议(3: auth_aes128_md5)

  • 选择混淆(1: plain)

  • 设置客户端数量(默认: 无限)

  • 设置单线程限速上限(默认: 无限)

  • 设置总速度限速上限(默认: 无限)

  • 等待安装完成

中途会有一些确认操作
安装完成后会给出 SSR 配置信息,配置信息在配置客户端时会用到,可以先保存到一个文本里
还会给出 SSR 链接和 SSR 二维码,可以方便的配置 windows 和 android 的 SSR 客户端

下载 SSR 客户端

Linux

  • 下载 ssr 安装脚本

  • 放到到/usr/local/bin/下,可以随时通过命令开启

    sudo mv ssr /usr/local/bin

  • 安装 ssr 客户端

    sudo ssr install

  • 进行 ssr 配置

    sudo ssr config

  • 配置信息填安装服务器时的信息,主要有:

    字段 含义
    server 服务器 IP
    server_port 服务器端口号
    password 密码
    method 加密方式
    protocol 协议
    obfs 混淆
  • 需要启动时

    sudo ssr start

  • 需要停止时

    sudo ssr stop

  • 查看更多指令
    sudo ssr help

windows

android

代理白名单

https://github.com/gfwlist/gfwlist/blob/master/gfwlist.txt